Home


Noises, Poor Performance, Easy Fixes, and Tune Up

  1. What is that low-pitched somewhat rumbling, intermittent sound coming from the front end of the 740 Turbo intercooled Volvo, especially at low speeds?

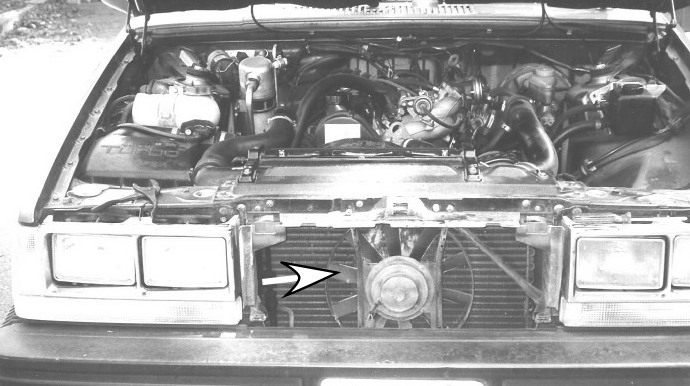
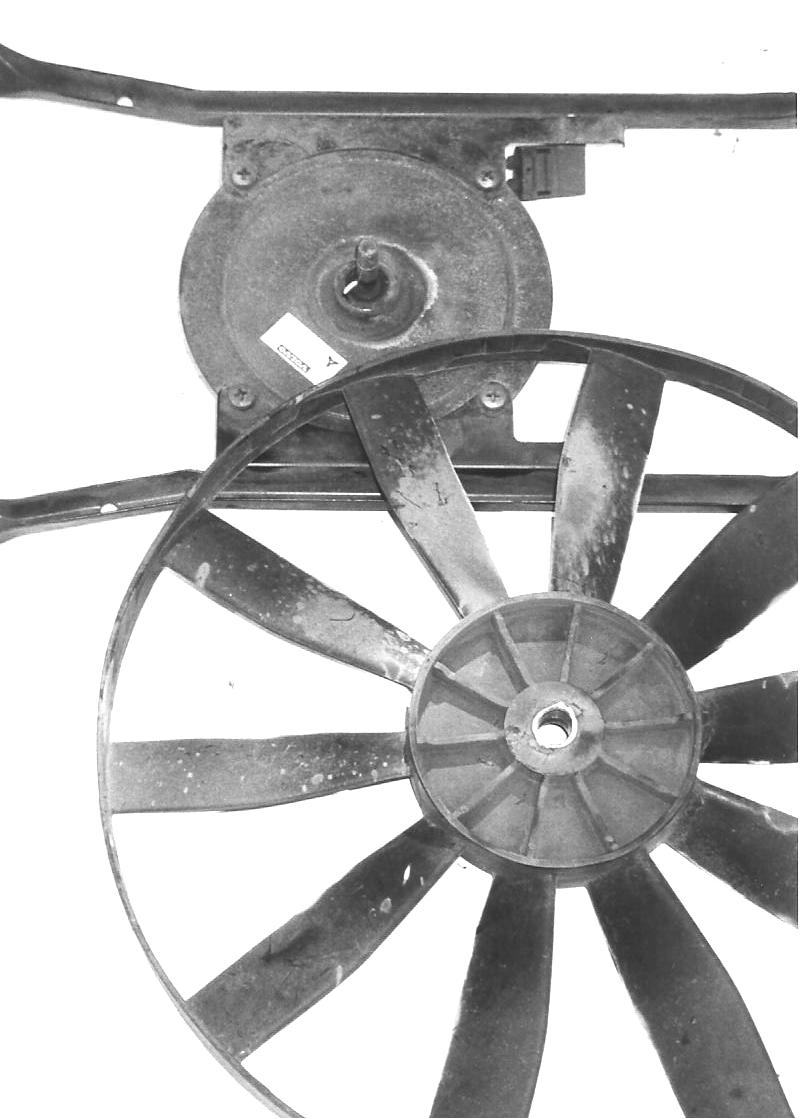
Well, I lived with that sound for years, even changing out the front wheel bearings before I figured it out. It was the intercooler fan (also known as the air-conditioning fan in some manuals) in front of the intercooler (left, arrow, grille removed). The inner keyway, if I remember correctly, had worn away on the fan center housing so that it was no longer locked to the spline on the rotating shaft (bottom left). So, the fan was running independently of the shaft and making noises. Once I replaced it with a good scrapyard fan, the noise stopped.
 

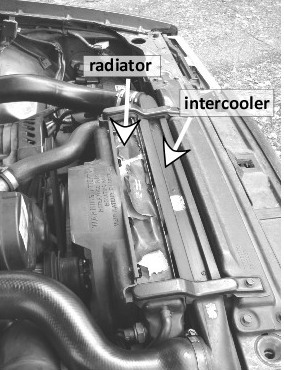
Turbochargers, driven by exhaust gases, increase engine power and efficiency by forcing air into the intake manifold under pressure. Set between the turbocharger and intake manifold is the intercooler. The intercooler acts as a heat exchanger to cool the compressed (heated) air from the turbocharger, thus reducing the risk of detonation. After all, in a gasoline engine, detonation is supposed to be initiated from a spark rather than from superheated air, as in a diesel engine.


2. Hiccupping (engine hesitates while car is driven). A possible low-cost repair is to get the part from a junkyard. The advantage is that you're not paying a lot of money for a suspected part that may not be the culprit at all. The disadvantage is that the junkyard part may not work.

Hiccups are hard to isolate because of their random, intermittent occurrences. Some possible culprits:


a) If your car has trouble going up hills, all the while spewing black exhaust smoke, the simplest possible fix is a new air filter. This solution was all it took to correct the cause for the aforementioned symptoms on my 740 Volvo Turbo.


b) Try replacing the fuel pressure regulator (arrow).


c) Another good option is replacing the fuel injection relay (arrow). Access it by pulling out the ashtray and fuse cover plate, then remove cigarette lighter shelf (Phillips screw beneath plastic snap-off cover plate). Release and lift tray out. The fuel injection relay has a white housing and is leftmost, second row behind fuse tray. Gently pull up to remove from tray.


d) It may well be the old, worn engine wiring harness. 1980 - 1987 Volvos have wiring harnesses that degraded from engine heat after several years of driving. This was especially prevalent in turbos because of their higher heat output. The insulation would fall apart, exposing bare wires, possibly leading to all sorts of gremlin-like behavior. I recommend a new wiring harness or a very good used one from a reputable dealer. A brand new one for the 740 Turbo is ~$450 from IPD. The part is expensive and the job is a bit involved. I haven't attempted it yet. A good website about wiring harnesses is http://www.davebarton.com/volvoharnesses.html.


e) For those Volvos with a Hall sensor (see photo of Hall plug below), a failing Hall sensor will give rise to hiccups. Other symptoms include a no-start, wait a while, still no-start, wait a while longer, and then engine finally starts. Lots of oil on the Hall plug is a precursor to a failing Hall sensor. If you see lots of oil on the Hall plug, I suggest pulling the whole distributor out and replacing the big green O-ring before the Hall sensor is short circuited. At the same time, check to see that the feed wires to the Hall plug are still in good shape. If they are, wipe oil from them. If the wires are not in good shape, you may wish to consider replacing the Hall plug wire.


3. My 240 Volvo doesn't start.

There are two simple checks to do first. Check fuse 6 or 7 (the main fuel pump), depending on your year, to make sure it is intact. If you don't hear the engine turn over, (a) check for 12 VDC across battery terminals, and (b) clean the connections to the battery posts and the ground cable connections, especially that at the front wheel well (see Basics of Diagnoses and Other Hints).


4. Tune Up: distributor cap and rotor replacement for in-line distributor


Number the spark plug wires atop distributor, as shown, so that you know where to connect each wire when done. (The camshaft rotates clockwise as seen from front of engine looking backward. The firing order is 1-3-4-2. If you opened up the cap, the clockwise rotation of the rotor hits post contacts 1, 3, 4, 2, in that order. The contacts inside the distributor cap can be identified to each outside post by continuity tests. See below.)

It is difficult to get to the three 8-mm bolts that hold the distributor cap in place. The easiest way is to use an 8-mm ratcheting box-end wrench. If you don't have that tool, the lower left and lower right bolts (as viewed from front of engine) can be accessed with a small 1/4" drive socket wrench. The middle top bolt, because the wire posts get in the way, can be accessed with a 1/4" drive universal socket.


Note position of old rotor before attempting to take it off. You want to install new rotor in same position. (At any rate, the nose of the rotor is aligned with the notch in the distributor shaft.)

The old rotor is very difficult to get off. I broke the tail end of this one by trying to pry it off with a single large flat-bladed screwdriver.


I've since come up with a better idea for getting the rotor off. Fashion two sticks, tapered at one end as shown. The sticks are about 6" long, ~1/2" wide, and 1/4" thick.


Insert tapered ends of the two sticks, one on each side of the rotor shaft, and lift rotor off by levering the top ends of the sticks. Makes life easier! By using sticks rather than screwdrivers, you won't damage the rotor or the plastic cover plate underneath.


Before installing the new rotor, I sanded down the distributor shaft with very fine sandpaper, wiped it clean, and lightly smeared the shaft with silicone grease---all in the hope that the rotor will release easier next time. When installing the new rotor, align position as noted for old rotor, then rotate slightly each way as you push down on it. You should hear an audible click when it's properly seated.


  The 1-3-4-2 firing order is readily apparent from this photo. Run your own continuity tests from each exterior post to each inside post to verify.